Flex布局简介
Flex英文为flexiable box,翻译为弹性盒子,Flex布局即弹性布局。
Flex布局为盒子模型提供了很大的灵活性,任何一个容器都可以指定为Flex布局,设置方法为:
.box{
    display: flex;
}
行内元素使用Flex布局
.box{
    display: inline-flex;
}
在webkit内核的浏览器上必须加上webkit前缀
.box{
    display: flex;
    display: -webkit-flex;
}
注意:使用Flex布局之后,里面的float、clear、vertical-align属性将失效。
Flex布局中的基本概念
采用 Flex 布局的元素,称为 Flex 容器(flex container),简称"容器"。它的所有子元素自动成为容器成员,称为 Flex 项目(flex item),简称"项目"。
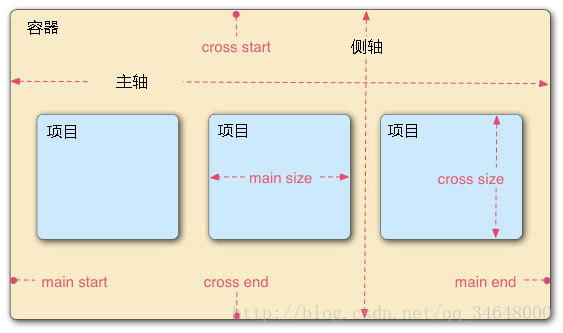
容器默认存在两根轴:水平的主轴(main axis)和垂直的侧轴(cross axis)。主轴的开始位置(与边框的交叉点)叫做main start,结束位置叫做main end;侧轴的开始位置叫做cross start,结束位置叫做cross end。
项目默认沿主轴排列。单个项目占据的主轴空间叫做main size,占据的侧轴空间叫做cross size。
容器的属性
1、flex-driection
2、flex-wrap
3、flex-flow
4、justify-content
5、align-items
6、align-content
1、flex-driection设置项目的排列方向,默认为row
flex-driection: row | row-reverse | column | column-reverse
当设置为flex-driection: row,效果:

当设置为flex-driection: row-reverse,效果:

当设置为flex-driection: column,效果:

当设置为flex-driection: column-reverse,效果:

如下代码直接复制保存为html文件即可以查看效果:
<style type="text/css">
.box{
    display: flex;
    display: -webkit-flex;
    /*水平方向,左端对齐*/
    flex-direction: row;
    /*水平方向,右端对齐*/
    /*flex-direction: row-reverse;*/
    /*垂直方向,顶部对齐*/
    /*flex-direction: column;*/
    /*垂直方向,底部对齐*/
    /*flex-direction: column-reverse;*/
    background: #999;
    width: 100%;
}
.box span{
    margin: 10px 10px;
    padding: 10px;
    background: #ff0;
    width: 50px;
}
</style>
<div class="box">
    <span>你好1</span>
    <span>你好2</span>
    <span>你好3</span>
    <span>你好4</span>
</div>
2、flex-wrap设置项目是否在一条线上,默认为nowrap
flex-wrap: wrap | nowrap | wrap-reverse
当设置为flex-wrap: wrap,效果:

当设置为flex-wrap: nowrap,效果(不换行,默认会缩放):

当设置为flex-wrap: wrap-reverse,效果(第一行在下方):

如下代码直接复制保存为html文件即可以查看效果:
<style type="text/css">
.box{
    display: flex;
    display: -webkit-flex;
    /*换行*/
    /*flex-wrap: wrap;*/
    /*不换行,默认*/
    /*flex-wrap: nowrap;*/
    /*换行,第一行在下方*/
    /*flex-wrap: wrap-reverse;*/
    background: #999;
    width: 100%;
}
.box span{
    margin: 10px 10px;
    padding: 10px;
    background: #ff0;
    width: 50px;
}
</style>
<div class="box">
    <span>你好1</span>
    <span>你好2</span>
    <span>你好3</span>
    <span>你好4</span>
    <span>你好5</span>
    <span>你好6</span>
    <span>你好7</span>
</div>
3、flex-flow属性是flex-direction属性和flex-wrap属性的简写形式,默认值为row nowrap
4、justify-content属性定义项目在主轴上的对齐方式,默认值为flex-start
justify-content: flex-start | flex-end | center | space-between | space-around
当设置为justify-content: flex-start,效果:

当设置为justify-content: flex-end,效果:

当设置为justify-content: center,效果:

当设置为justify-content: space-between,效果:

当设置为justify-content: space-around,效果:

如下代码直接复制保存为html文件即可以查看效果:
<style type="text/css">
.box{
    display: flex;
    display: -webkit-flex;
    /*默认,项目左对齐*/
    justify-content: flex-start;
    /*项目右对齐*/
    /*justify-content: flex-end;*/
    /*项目居中对齐*/
    /*justify-content: center;*/
    /*项目两端对齐*/
    /*justify-content: space-between;*/
    /*每个项目两侧的间隔相等*/
    /*justify-content: space-around;*/
    background: #999;
    width: 100%;
}
.box span{
    margin: 10px 10px;
    padding: 10px;
    background: #ff0;
    width: 50px;
}
</style>
<div class="box">
    <span>你好1</span>
    <span>你好2</span>
    <span>你好3</span>
    <span>你好4</span>
    <span>你好5</span>
    <span>你好6</span>
    <span>你好7</span>
</div>
5、align-items属性定义项目在纵轴上的对齐方式,默认值为stretch,适用于项目在纵轴上高度不一样的情况,为了更好的看到效果,我为项目添加了一些样式
align-items: flex-start | flex-end | center | baseline | stretch
当设置为align-items: flex-start,效果:

当设置为align-items: flex-end,效果:

当设置为align-items: center,效果:

当设置为align-items: baseline,效果:

当设置为align-items: stretch,效果:

如下代码直接复制保存为html文件即可以查看效果:
<style type="text/css">
.box{
    display: flex;
    display: -webkit-flex;
    /*纵轴的顶部对齐*/
    /*align-items: flex-start;*/
    /*纵轴的底部对齐*/
    /*align-items: flex-end;*/
    /*纵轴的中点对齐*/
    /*align-items: center;*/
    /*项目的第一行文字的基线对齐*/
    /*align-items: baseline;*/
    /*默认对齐方式,如果项目未设置高度或设为auto,将占满整个容器的高度*/
    align-items: stretch;
    background: #999;
    width: 100%;
}
.box span{
    margin: 10px 10px;
    padding: 10px;
    background: #ff0;
    width: 50px;
}
.box span:nth-of-type(2n){
    height: 80px;
    padding-top: 20px;
}
</style>
<div class="box">
    <span>你好1</span>
    <span>你好2</span>
    <span>你好3</span>
    <span>你好4</span>
    <span>你好5</span>
    <span>你好6</span>
    <span>你好7</span>
</div>
6、align-content属性定义了多根轴线的对齐方式。如果项目只有一根轴线,该属性不起作用。(即需要设置容器的flex-wrap属性值为wrap)(为了让效更加明显,我设置了容器的高度)
align-content: flex-start | flex-end | center | space-between | space-around | stretch
当设置为align-content: flex-start,效果:
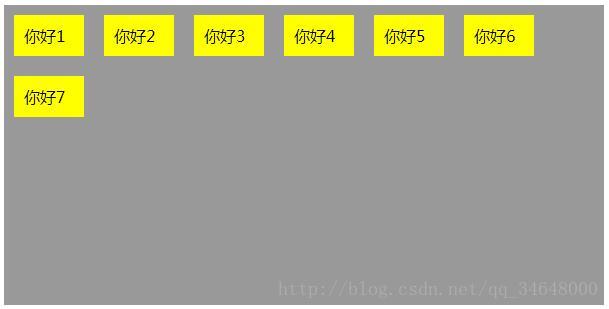
当设置为align-content: flex-end,效果:
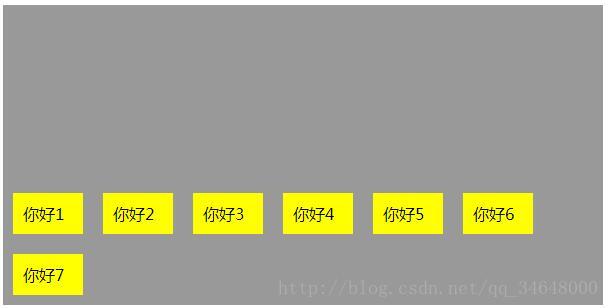
当设置为align-content: center,效果:
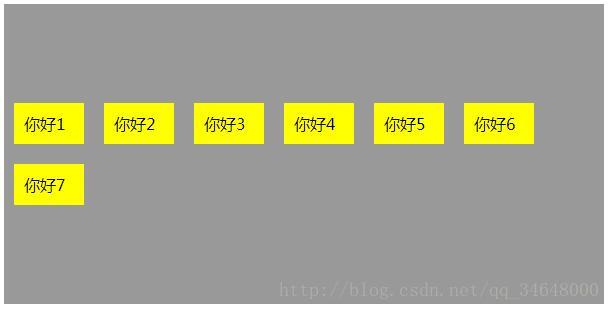
当设置为align-content: fspace-between,效果:
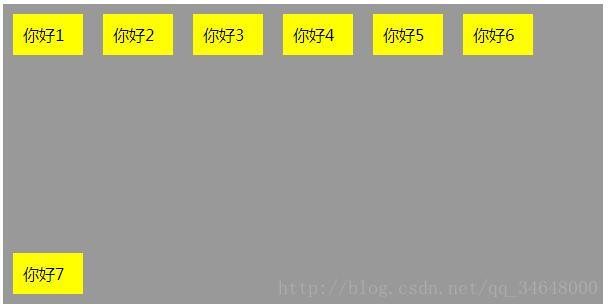
当设置为align-content: flex-start,效果:
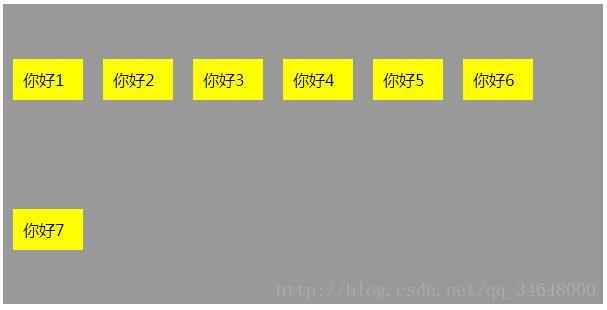
当设置为align-content: stretch,效果:
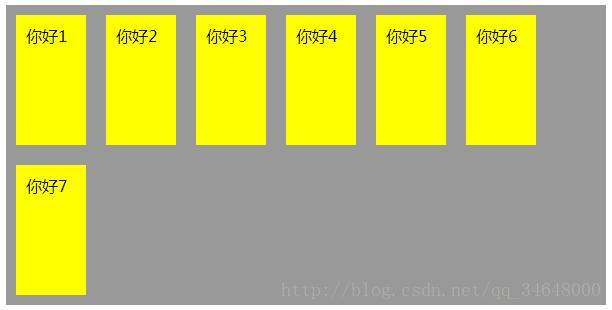
如下代码直接复制保存为html文件即可以查看效果:
<style type="text/css">
.box{
    display: flex;
    display: -webkit-flex;
    flex-wrap: wrap;
    /*与纵轴的顶部对齐*/
    /*align-content: flex-start;*/
    /*与纵轴的底部对齐*/
    /*align-content: flex-end;*/
    /*与纵轴的中点对齐*/
    /*align-content: center;*/
    /*与纵轴两端对齐*/
    /*align-content: space-between;*/
    /*每根轴线两侧的间隔都相等*/
    /*align-content: space-around;*/
    /*默认值,轴线占满整个交叉轴默认值,*/
    align-content: stretch;
    background: #999;
    width: 600px;
    height: 300px;
}
.box span{
    margin: 10px 10px;
    padding: 10px;
    background: #ff0;
    width: 50px;
}
</style>
<div class="box">
    <span>你好1</span>
    <span>你好2</span>
    <span>你好3</span>
    <span>你好4</span>
    <span>你好5</span>
    <span>你好6</span>
    <span>你好7</span>
</div>
项目的属性
1、order
2、flex-grow
3、flex-shrink
4、flex-basis
5、flex
6、align-self
1、order定义项目的排列顺序。数值越小,排列越靠前,默认为0。
如下为第1个设置order属性为10,第2个设置order属性为-1,第5个设置order属性为-10,效果如下

如下代码直接复制保存为html文件即可以查看效果:
<style type="text/css">
.box{
    display: flex;
    display: -webkit-flex;
    background: #999;
}
.box span{
    margin: 10px 10px;
    padding: 10px;
    background: #ff0;
}
.box span:nth-of-type(1){
    order: 10;
}
.box span:nth-of-type(2){
    order: -1;
}
.box span:nth-of-type(5){
    order: -10;
}
</style>
<div class="box">
    <span>你好1</span>
    <span>你好2</span>
    <span>你好3</span>
    <span>你好4</span>
    <span>你好5</span>
</div>
2、flex-grow属性定义项目的放大比例,主要在父元素的宽度大于子元素的宽度之和时候起作用,它定义子元素如何分配父元素的剩余宽度,默认为0,这个时候不索取父元素的宽度。
如下,给第1个子元素设置flex-grow属性值为1,第2个子元素设置flex-grow属性值为1,则父元素的剩余宽度会被分成三等分,分别添加给第1个第2个子元素,效果如下:

如下代码直接复制保存为html文件即可以查看效果:
<style type="text/css">
.box{
    display: flex;
    display: -webkit-flex;
    background: #999;
}
.box span{
    margin: 10px 10px;
    padding: 10px;
    background: #ff0;
    width: 50px;
}
.box span:nth-of-type(1){
    flex-grow: 1;
}
.box span:nth-of-type(2){
    flex-grow: 2;
}
</style>
<div class="box">
    <span>你好1</span>
    <span>你好2</span>
    <span>你好3</span>
    <span>你好4</span>
    <span>你好5</span>
</div>
例如:以上面的为例子,假设父元素的宽度为1000px,每个子元素的宽度为100px,则还剩余500px的宽度,第1个子元素flex-grow值为 1,第2个子元素flex-grow值为 2,则会把500px分成三等分,第1个子元素增加500乘以1/3px的宽度,第2个子元素增加500乘以2/3px的宽度
3、flex-shrink属性定义了项目的缩小比例,默认为1,即如果空间不足,该项目将缩小。
如果项目没设置flex-shrink属性,则项目的默认flex-shrink值为1,当空间不足时,都将等比例缩小。如果一个项目的flex-shrink属性为0,其他项目都为1,则空间不足时flex-shrink属性为0的项目不缩小。
flex-shrink的原理和flex-grow类似,理解一个另外一个就不难了。
4、flex-basis属性定义了在分配多余空间之前,项目占据的主轴空间(默认值为auto,即项目的本来大小)
注意:如果同时给项目设置flex-basis和width属性值,则flex-basis会覆盖width的值。例如同时给项目设置属性,flex-basis:80px;width:100px;则项目的实际宽度是80px;
5、flex属性
flex属性是flex-grow, flex-shrink 和 flex-basis的简写,默认值为0 1 auto。
6、align-self属性
align-self属性允许单个项目有与其他项目不一样的对齐方式,可覆盖align-items属性。默认值为auto,表示继承父元素的align-items属性,如果没有父元素,则等同于stretch。
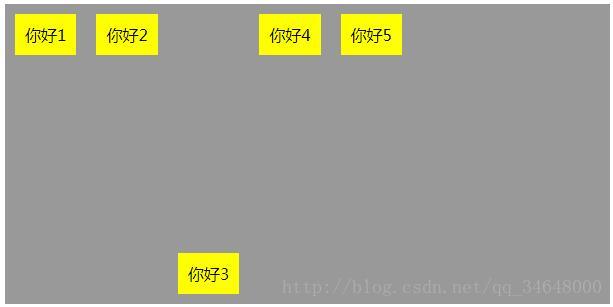
如下代码直接复制保存为html文件即可以查看效果:
<style type="text/css">
.box{
    display: flex;
    display: -webkit-flex;
    background: #999;
    height: 300px;
    align-items: flex-start;
}
.box span{
    margin: 10px 10px;
    padding: 10px;
    background: #ff0;
}
.box span:nth-of-type(3){
    align-self: flex-end;
}
</style>
<div class="box">
    <span>你好1</span>
    <span>你好2</span>
    <span>你好3</span>
    <span>你好4</span>
    <span>你好5</span>
</div>
参考:
[1] http://www.ruanyifeng.com/blog/2015/07/flex-grammar.html
[2] https://developer.mozilla.org/zh-CN/docs/Web/CSS/CSS_Flexible_Box_Layout/Using_CSS_flexible_boxes
[3] http://blog.csdn.net/qiudw_01/article/details/47061099
[4] https://www.w3cplus.com/css3/a-guide-to-flexbox-new.html
到此这篇关于Flex布局做出自适应页面(语法和案例)的文章就介绍到这了,更多相关Flex布局自适应页面内容请搜索以前的文章或继续浏览下面的相关文章,希望大家以后多多支持!


